 Are you facing error message during the restoring or backup process? If yes then it is sure that your DB2 database file gets corrupt or you are trying to restoring or create backup of any damaged DB2 file. DB2 database gets corrupt or damaged due to either logical or physical errors. Logical causes such as application malfunction, improper system shutdown, virus attack, concurrent execution, and operating system malfunction and physical causes such as over heat, water, physical damaging, and natural disasters; so that both causes are harmful for this database.
But keep in mind that if your database gets damaged physically then the recovery can only be achieve by a reputed data recovery organization. And if you are facing error message or database corruption because of logically damaged then database is easily recovered by applying any manual method or by the help of third-party DB2 Repair tool.
Take the example that you want to make a latest backup file of your DB2 database and so you run backup command but during the process your database file display an error message and the whole backup process gets rollback due to the appeared error. The error displayed by the database is given bellow:
SQL0980C A disk error occurred. Subsequent SQL statements cannot be processed.
This error message will make the whole process halted and you become unable to make a backup file of your database. After this error message you cannot execute any command on your database because of corruption. When user opens the log file to see the cause of error then on viewing of db2diag.log file, you see the below given error message:
MESSAGE: ADM6023I The table space “SYSTOOLSTMP” (ID “28”) is in state 0x”0″. The table space cannot be accessed. Refer to the documentation for SQLCODE -290.
Cause of DB2 backup Error message:
- Logical errors are responsible for this type of error, causes like:
- Virus and computer malware infection can affect the DB2 file
- Application malfunctioning
- Improper shutdown of computer system or system shutdown while DB2 executing any task
- Concurrent execution of task will also affect the DB2 file
- Operating system malfunction
Resolution:
To fix the above error message you need to perform manual restoration of DB2 database, this will easily fix the all types of error message. But before executing any backup process make sure that the backup file is updated because an outdated backup file can affect the stored information. If you have an updated backup of your error showing DB2 database then use it and fix all type of error message.
 |
 |
 |
If you don’t have any backup or unable to restore DB2 by use of backup file then don’t worry because there is a repair tool is available for such type of problems. Use the free DB2 recovery tool and make your database error free.
This tool is able to fix all types of error message, it contain very strong algorithm so that it easily fix errors. No need of special knowledge is required because it easy to understand and operate so that one can operate it and fix error without need of any user manual. Its features makes it more popular among the user and it is also recommended by many professionals, so free download DB2 Repair tool and restore your DB2 database without need of any backup file.
Steps to Recover DB2 database Post “SQL098-C a disk error occured”:
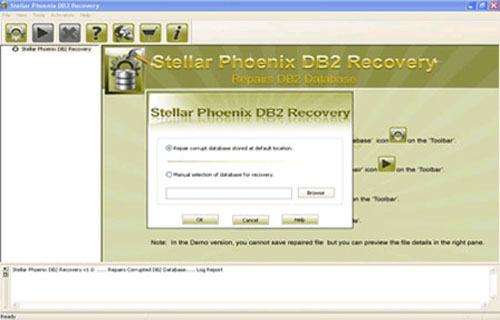
Step 1: Download, Install and Run DB2 File Repair software. It will provides two options to repair db2 file, first option is for if the database is attached to DB2, then you can select the option ‘Repair the database stored at default location‘, and if the database is not attached to DB2 then choose the manual selection of database.
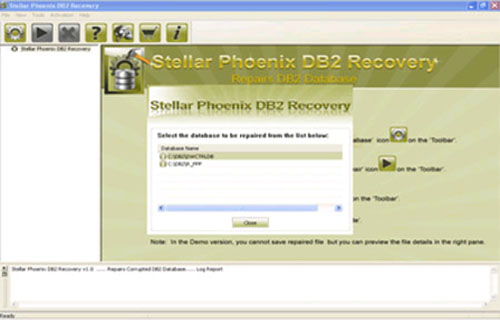
Step 2: It will provide you the list of database attached to DB2. Select the particular database you want to repair and recover corresponding database objects.
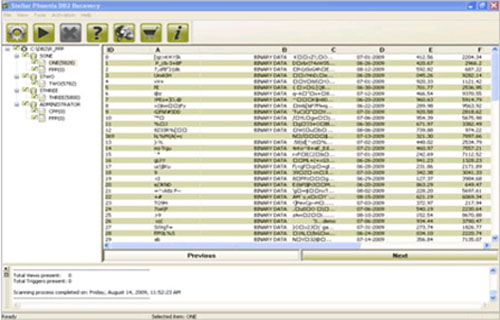
Step 3: In this step this tool provide the list of recoverable database files. You can see the preview by clicking on it.
Step 4: Give the path location for the recoverable database and its object to be saved. Click on ‘Ok’ button.


Jacob Martin is a technology enthusiast having experience of more than 4 years with great interest in database administration. He is expertise in related subjects like SQL database, Access, Oracle & others. Jacob has Master of Science (M.S) degree from the University of Dallas. He loves to write and provide solutions to people on database repair. Apart from this, he also loves to visit different countries in free time.