
Quickbooks file is a perfect tool for businesses doesn’t matter whether it is on a large scale or a small scale. Using the QuickBooks file one can easily store & share employees, services, customers, vendors, etc.
We all know that due to its easy management features it saves lots of our time. However, even after having such great features, it has some flaws too. Users often get different kinds of errors on QuickBooks files. So, today we are going to discuss one such error, i.e error 12029.
Quickbooks error 12029 is mainly caused due to the misconfigured or corrupted Windows system files. So, if you ever get this error on your QuickBooks file it is advisable to get it fixed ASAP.
Well, if you don’t know how to fix Quickbooks error 12029, then in this blog I will help you to fix this common error.
What are the Reasons Behind Getting QuickBooks Error Code 12029?
- When your antivirus blocks QuickBooks from accessing the server.
- Due to the Network Time Out.
- Using wrong SSL Settings.
- If the Internet Browser is not supporting QuickBooks.
- Lost Internet Packets.
- Due to the QuickBooks connection failures
- If there are any connection issues with QuickBooks
- QuickBooks update timeout
- If QuickBooks is blocked by the server
How to Fix QuickBooks Error 12029?
Fix 1: Configure Antivirus and Firewall
- In order to configure the Windows Firewall, you need to use the QuickBooks file doctor tool. If you don’t have it, then install it on your system.
- Once the tool is installed, run it on your computer.
- Now, this tool will automatically configure your Windows Firewall.
- Now, check if it fixed the error or not.
Fix 2: Optimize Internet Explorer Settings
- First, close the QuickBooks tool.
- Now, open the Internet Explorer.
- Press the Alt key to see all the tools.
- Launch the Internet options.
- Go to the Security tab.
- On the Security, search for the find the Globe icon.
- Now, ensure the security level is set to the medium-high option.
- Switch to the Connections Tab.
- Select the Never Dial a Connection option. If you are using the dial-up node, then choose the right internet service provider.
- Now, click on the OK button and go to the LAN settings page.
- Next, search for the Automatically detect settings option and select it.
- Go to the proxy server checkbox and enter the full IP address & port.
- Click on the OK button.
- Go to the Advanced tab.
- Select the Restore Advanced settings option.
- Choose the TLS 1.2 option and click on the OK button.
- Lastly, restart your computer.
Fix 3: Check your Internet Connection
- Open your Internet Explorer.
- Now, try to open any website.
- If you get any error while opening the website, then check the internet connection settings for misconfigurations.
- Make sure the date and time on your system are correct.
- Launch Internet Explorer.
- Click on the Tools > go to the Internet options.
- Now, go to the Advanced tab and click on the Reset/Restore Defaults.
- Click on the Apply and Ok button.
Fix 4: Update the Internet Connection Settings
- Launch Internet Explorer > go to the Tools option located under Internet options.
- Go to the General tab and click on the Delete button.
- Select the Temporary Internet Files option > click on the Delete option.
- Go to the Connections tab > click on the LAN settings button.
- Check the Automatically Detect Settings checkbox.
- Make sure the Proxy server box is blank > click on the OK button.
- Make sure to select the TLS 1.2 checkbox and uncheck the TLS 1.0 and TLS1.1 options.
Fix 5: Set Local System Time
- First, update your system.
- Now, update the QuickBooks accounting software.
- Verify the internet latency to check for any dropped internet packets.
- Now, upgrade your Internet Explorer > set it as the default browser.
- Configure the SSL setting correctly.
- Make sure to enable the TLS 1.2.
- Configure your Internet Firewall & Internet security.
- Reboot your computer.
Fix QuickBooks Errors With QuickBooks Repair Tool
If you are struggling to fix the QuickBooks errors and issues using the basic manual troubleshooting ways, then I highly recommended using the QuickBooks Repair Tool.
This tool is capable of fixing all QuickBooks-related issues. It is the most reliable and efficient solution to repair all the files from your corrupted or damaged QuickBooks without any data loss. This repair tool performs the complete scan on the QBW file and able to recover the entire records.


It helps in restoring the recovered QBW files at the user-defined location. It fixes all QuickBooks errors effectively and makes your file accessible. This tool is extremely safe as it does not harm the original file because the repair process is carried on a copy of the original file.
The entire transactions are recovered by this software in their unique currencies. It provides a streamlined recovery process and has automatic updating efficiency.
It is easy to use and has a user-friendly interface, so you don’t need any prior technical knowledge and can be easily used by non-technical users also.
How to Fix QuickBooks Errors/Issues Using QuickBooks Repair Tool
Here are the steps you need to follow to fix the “This Is Not A QuickBooks Data File Or Is Damaged” error using QuickBooks Repair Tool:
- First, download and install the QuickBooks Repair Tool.
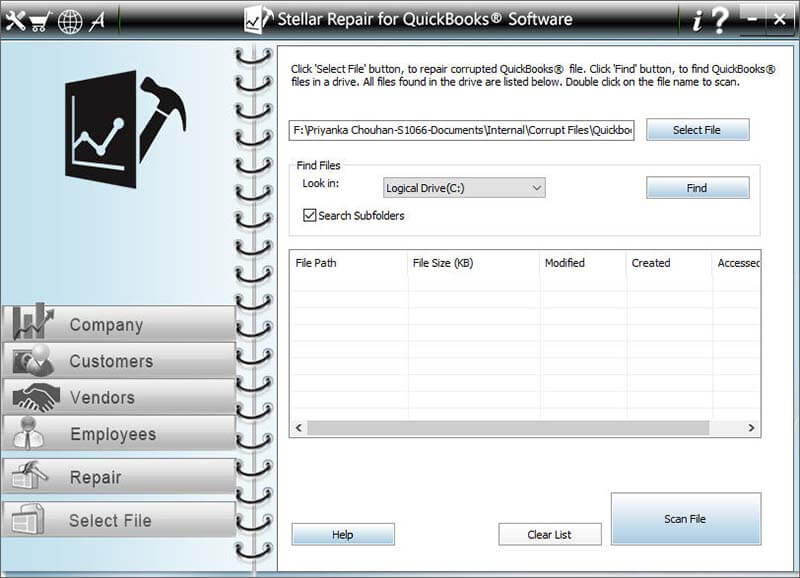
- Open the tool, then click on the Select File button and select the corrupted .QBW file. You can also click on the ‘Find‘ button to search the corrupted .qbw file in a particular drive.
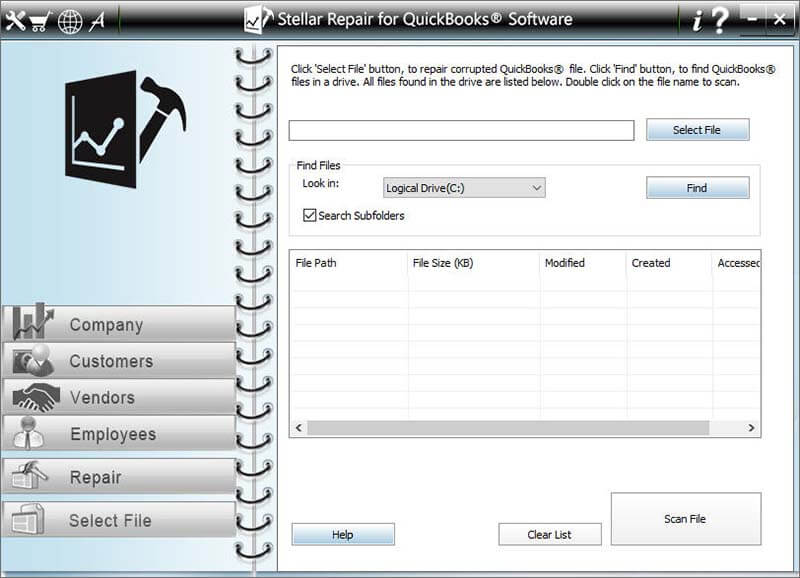
- Now, you will get a list of QuickBooks files from the selected drive. Here, choose the corrupt file and then click on the Scan File button to start the scanning process.
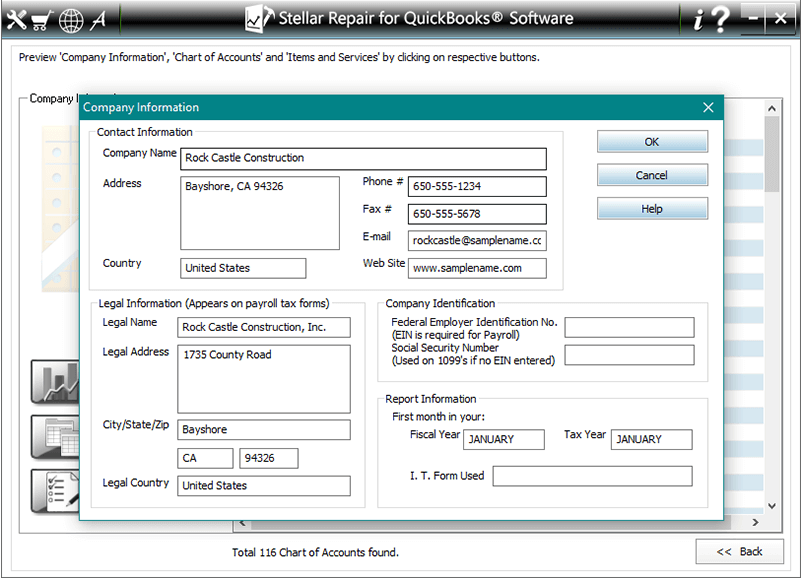
- Once the scanning process is finished, follow the on-screen instructions to see a preview of the data.

- Now, you can preview the company, customers, vendors, and employee information.
- Click on the Company button to preview the company information.
- To preview the customer information, click on the Customers button.

- Click on the Vendor button to preview the information of the Vendor.

- Preview the employee information by clicking on the Employees button.

- Click on the Browse button to specify the path of the new blank file you have created.
- Select the QuickBooks version.
- Click on the ‘Start‘ button to start the saving process.

- Once you save the QuickBooks file successfully, the software will prompt you this message “Repair Process Completed Successfully“.

Over to You
Now, you have complete detail of QuickBooks error 12029, including its causes and solutions. So, follow these solutions and get the QuickBooks error code 12029 fixed easily on your computer.
Apart from the manual troubleshooting methods, I have also mentioned the expert solution “QuickBooks Repair Tool” that will help you to deal with the QuickBooks errors and issues. So, don’t forget to give it a try.
In case, if you are still unable to fix the error 12029 on QuickBooks, then let us know on Facebook or Twitter. We will try our best to provide the desired solutions in order to fix this error on your end.
Good Luck!!

Steven Telfer is a senior writer at filerepairtool.net. He is a technology expert having over 4 years of experience and loves to write in different subjects like Video Repair, Microsoft Excel, QuickBooks, Word & others. He has a Master’s degree in Computer Application and has solve many technical problems. In free time, he loves to read books and do research work to grow in his field.