![]()
DB2 is a family of Relational Database Management System (RDBMS) which is developed by IBM. This is based on the relational model. This file format was introduced by IBM in the year 1983 for the Multiple Virtual Storage (MVS) mainframe platform but after few years it was redesign it as a DB2 “common server” product that is redesigned with a general code base in order to run on different operating system platform such as Windows, UNIX and in LINUX. This database store the data in a tabular form and so it can be executable by the requested query in less than half of a second and the display the accurate result. It contains a lot of features and also it is a high performance database engine which provides numerous features to the users. Users can also store and manipulate a large amount of data with the use of this file. It also provides protection of data, restrict unauthorized entry, reduce data redundancy and other important features are also provided by it. The db2 file format can be used by the many reputed organizations for storing and manipulating large amount of data in a particular manner. It can be operated by the database from a command line argument as well as by Graphical User Interface (GUI).
Sometimes db2 file also gets corrupted and it really makes very difficult for the users. So if the users are aware of the reasons behind the corruption of db2 file then user can prevent their file to get corrupted. Following are some of the reasons behind the corruption of the db2 file:
- When database object is corrupted then db2 will also get corrupted.
- Virus infection or attacks of ay harmful malware.
- Abnormal shutdown of system or server is occurred.
- Due to application malfunctioning.
- Due to software bugs.
- Due to kind of Network issue.
- Corruption ay take place due to any software or hardware related issues.
 |
 |
 |
We can recover db2 files using ROLLFORWARD command. But, this command can be used in some special cases like when you perform a change to the database after you backed it up and if the changes you made to rows lost.
In this case you can use ROLLFORWARD command. It allows you to recover changes to your database from transaction logs that DB2 maintains.
You can use this command through:
- The command line processor (CLP).
- The database Rollforward Wizard in the Control Center.
- The db2 Rollforward API.
How does ROLLFORWARD command work:
Add a new row to the database table.
db2=> Insert into secret identities values.
You would not be able to see the row insert below if you restored your database from the image you have created earlier.
Now you can perform Rollforward using the given syntax:
db2=> rollforward database backdem user db2admin using db2admin.
At the end of logs and stop.
Alternative method:
If you are unable to apply the above given method due to the lack of knowledge, then don’t worry because for you an alternative method to repair your corrupt database. Apply the professionally designed DB2 Repair Tool, this tool is specially designed for the normal user. One can also repair their DB2 file without need of any backup file, yes it is true one can restore their corrupt database without need of any backup file. Simply download this efficient tool and get back your data with ease.
Steps to Recover DB2 Database using ROLLFORWARD command:
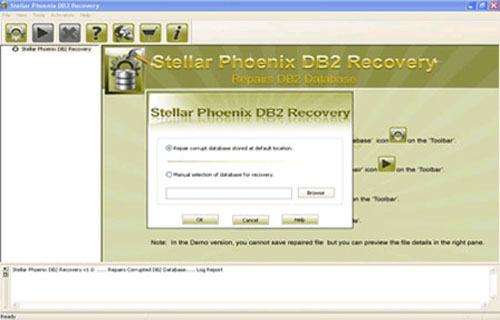
Step 1: Download, Install and Run DB2 File Repair software. It will provides two options to repair db2 file, first option is for if the database is attached to DB2, then you can select the option ‘Repair the database stored at default location‘, and if the database is not attached to DB2 then choose the manual selection of database.
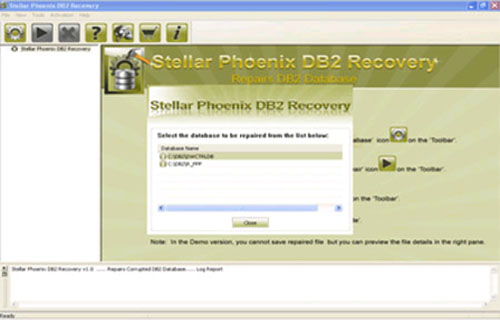
Step 2: It will provide you the list of database attached to DB2. Select the particular database you want to repair and recover corresponding database objects.
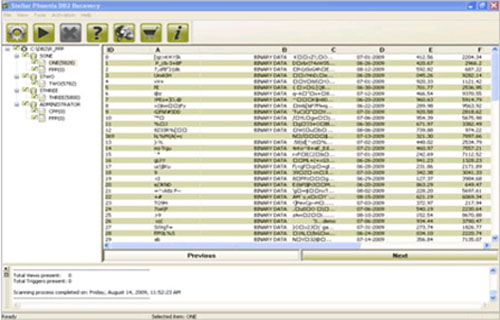
Step 3: In this step this tool provide the list of recoverable database files. You can see the preview by clicking on it.
Step 4: Give the path location for the recoverable database and its object to be saved. Click on ‘Ok’ button.


Jacob Martin is a technology enthusiast having experience of more than 4 years with great interest in database administration. He is expertise in related subjects like SQL database, Access, Oracle & others. Jacob has Master of Science (M.S) degree from the University of Dallas. He loves to write and provide solutions to people on database repair. Apart from this, he also loves to visit different countries in free time.